Showing posts with label rapid prototyping. Show all posts

Tuesday, 18 February 2014

The cat's out of the bag!

First off, please let me apologise for the horrible cat pun title. I was going to go with a far more random and obscure reference, but I eventually declined. This is, quite possibly, the most famous thing I have ever, or will ever work on! The beacon of hope in the eyes of millions, the Monopoly cat! No more will cat lovers have to settle for the Ship or Top Hat, the Iron or Motor Car, now, there is this little guy/gal!

 As an absolute cat freak, I mean uhh, cat lover, I was more than happy to sculpt this little dude up!
 To get a better feeling of the final result, the little guy was rendered up in Keyshot to get that real metal feel!
Hasbro wanted to replace one of the original movers with a new one, and started this campaign to vote the new and most popular mover in!
It was a landslide victory for the cat, who proved so popular that he/she beat all the other contenders, even the robot!!!
 
 
The cat proved so attractive that the cardboard cutout on the voting stand at the Hasbro booth in the 2012 London Toyfair was stolen! I'm just glad that I got to sculpt it, because the other digital sculptor at Designworks is a DOG PERSON! 

Tuesday, 28 January 2014

The Eleventh Hour! The Eleventh Doctor Matt Smith laser scan clean up!


LASERS! PEW PEW PEW! Nope, not that kinda laser, the non lethal real kind. At Designworks Windsor we have a 3D laser scanner, which allows us to capture a persons' facial contours. I'm sure you're up on the whole scanning thing, it's been happening for a while, now. Still, it's really cool!
So we scan Matt Smith, the data is correlated and refined in a computer, then the product is something like this:
 
Laser scanners can't really deal with fine uneven textures or shiny things, so eyes and hair are lost in the scanning process. The eyes are replaced, and I tend to recreate the back of the skull to help visualise hair:
 I split facial features up in Freeform Modelling Plus to help get sharp, defined lines between the details, like the eyelids, lips and nose.
 Now I start to block in the hair and eyebrows.
 Here is a render of the final head from Freeform Modelling Plus.
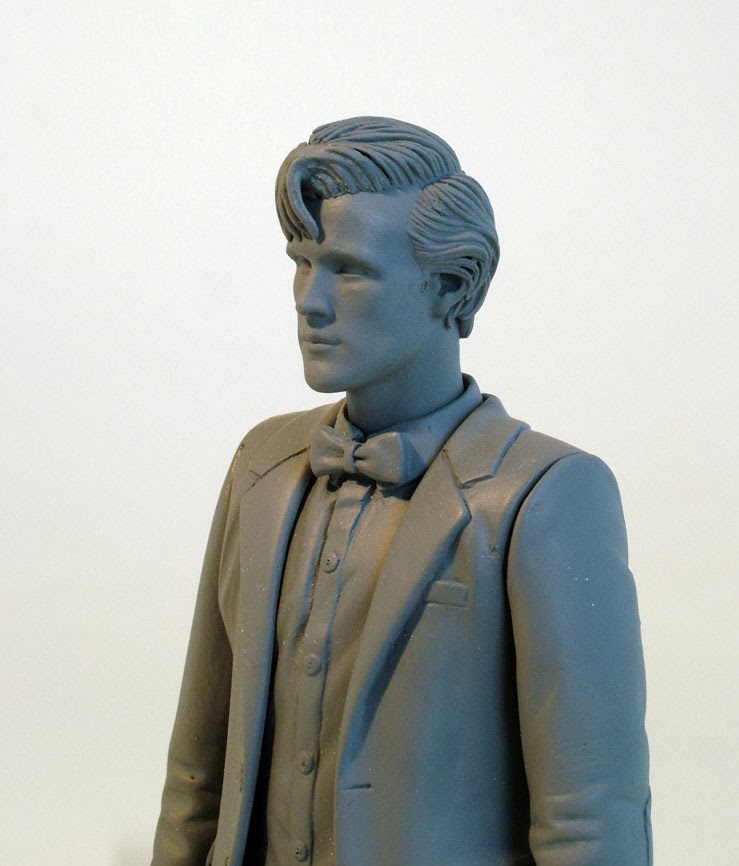
 The piece is then scaled, and the neck joint is placed onto it to fit the practically (real world, modelling putty/clay) sculpted body! This is then printed in the highest possible quality by Gary Miller at Industrial Plastics, who do all our Perfactory printing, http://ipfl.co.uk/

 
The head is then cleaned up, sprayed grey and placed on the body! Due to the fact we were working on the action figure months before release, Matts' hair had changed between the reference images we were given and when shooting started, so the hair was amended practically! This figure was then tooled (molded) in silicone, cast in resin, and then these casts were sent out to the Far East to start production of the toys! HUZZAH! Toys for everyone!


Friday, 20 December 2013

Ch..ch...ch..check it out!

Check out the insanely awesome artwork skills, sculpting skills, nunchuck skills and bo staff skills of my mate phill hosking here! Honestly, he's a fiend, it make me want to cry, he's so good!

Zombies... So hot right now...

Here is the digital sculpt I did way back in about 2009 for the Dead Rising 2 video game promo action figure. I had to sculpt the body type, then add all the articulation, as the turnaround time for the figure was very short...

I had to look at a few wobbly bums for reference here...
 Below you can see all the articulation that had to be put in for the figure. He needed 28 points of articulation, which all had to be tolerance, so a gap of 0.15 millimetres was required between every moving surface, so that when printed, tooled, cast and then eventually manufactured, there would be enough space between his joints to allow movement.
We then did a test print on a Thermojet wax printer to check that the scale was correct...


 Here is a quick paint job I did in Freeform, as I would have liked him to be painted, but this was purely for my own personal satisfaction, as a production paint job like this would have been way too expensive.

Okay, I gotta say, I think this bit is kinda cool, I'd never seen infection points on a zombie action figure before, so I quickly hit the net, found some images of tooth marks, took them into Photoshop, inverted the colours, and was then able to use them as alpha channels, images I could use in Freeform to apply physical textures onto the clay surface. So there we have it, the bite marks of the zombies that turned our friend here!
Here are pictures of the prototype we made, after getting the separate perfectory prints form Gary Miller at Industrial Plastics, who did a beautiful job of making our zombie real!